Do you have a website for your business, and running Facebook ads, but without having a Facebook pixel installed? Then, I am sure that you are not seeing the success you would like to see on your ad analytics, right? Let’s be real, and say that you don’t know what a Facebook pixel, or these days, a Meta pixel, is.
Well, luckily, I am going to make your life a little easier today by telling you exactly what a Facebook pixel is in this ultimate guide. I am going to take you step-by-step through the process of installing the Facebook pixel on your website. It is so easy! You will see your Facebook ads success rates increase instantly.
Facebook pixel is a very powerful tool, so, you should not skip over this easy-to-understand guide. If you are ready to see changes in your online statistics, keep reading and let me help you!
What Is a Facebook Pixel?
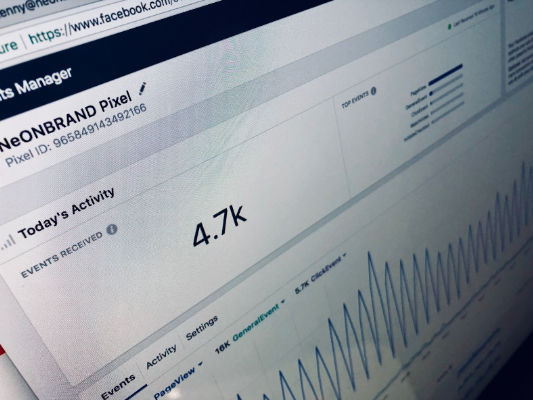
A Facebook pixel is basically code that you add to your website to track user behavior and gather valuable data. You get the Facebook pixel code from Facebook itself. The information you get from the Facebook pixel will help you optimize your Facebook campaigns. You can target the right audience. The data you receive from the Facebook pixel will help you make informed, data-driven decisions on how you can improve all of your Facebook ad campaigns and digital marketing strategy.
Why Should You Use a Facebook Pixel?
There are several reasons why businesses should consider using a Facebook pixel:
Improved Ad Targeting
By understanding your audience’s behavior, you can create more relevant ads, ensuring that your marketing budget is spent efficiently.
Conversion Tracking
A Facebook Pixel will help you to better track conversions made from specific ads. This insight will help you optimize future ads, and improve your future conversion rates.
Remarketing Capabilities
What does remarketing mean? Remarketing means that you target people that already visited your website. Naturally, people that already visited your website will be more likely to convert into paying customers and clients.
Optimize Ad Delivery
By using the Facebook pixel data, Facebook can automatically optimize your ads for better performance and higher conversion rates. You will be impressed with the end results!
Gain Valuable Insights
This is an obvious reason why you should make use of a Facebook pixel. You can gain insanely valuable insights from your Facebook pixel analytics. The insights will tell you how your website visitors are behaving on your website and ads.
How Facebook Pixel Tracks Behavior’s
As I mentioned before, Meta Pixels work by tracking peoples actions. Theses actions that are called “events” needs to be tracked by certain code that you need to add. Luckily, Facebook made this very easy. You can easily just copy and paste the following Facebook event code:
Purchase: Someone completes a purchase on your website.
Lead: Someone signs up for a trial or otherwise identifies themselves as a lead on your site.
Complete registration: Someone completes a registration form on your site, such as a subscription form.
Add payment info: Someone enters their payment information in the purchase process on your website.
Add to cart: Someone adds a product to their shopping cart on your site.
Add to wishlist: Someone adds a product to a wishlist on your site.
Initiate checkout: Someone starts the checkout process to buy something from your site.
Search: Someone uses the search function to look for something on your site.
View content: Someone lands on a specific page on your website.
Contact: Someone contacts your business.
Customize product: Someone selects a specific version of a product, such as choosing a certain color.
Donate: Someone donates to your cause.
Find location: Someone searches for your business’s physical location.
Schedule: Someone books an appointment at your business.
Start trial: Someone signs up for a free trial of your product.
Submit application: Someone applies for your product, service, or program, such as a credit card.
Subscribe: This is for when someone subscribes to a paid product or service on your website.
After you created your “event”, you also have the option to add more details to your standard events. You can do this by using extra bits of code that we call, parameters. They allow you to customize your standard events based on more in-depth factors:
- How much a conversion event is worth
- Currency
- Content type
- Predicted long-term value
The Facebook Pixel and iOS 14.5
Facebook regulations keep changing, and this is a fact. As marketers, we need to adjust and stay on top of things. There were changes to third-party tracking on iOS 14.5 devices recently. Some of the Facebook pixel functionality were disabled for updated Apple devices.
How To Create and Setup Your Facebook Pixel
As you can see there are different things that you can track on your website with a Facebook Pixel. Below, I give you an easy-to-understand guide on how to create and setup you Meta Pixel.
Step 1: Create Your Facebook pixel
- From your Facebook Events Manager, click Connect to Data Sources in the left-hand menu, then select Web. Click Get Started to continue.
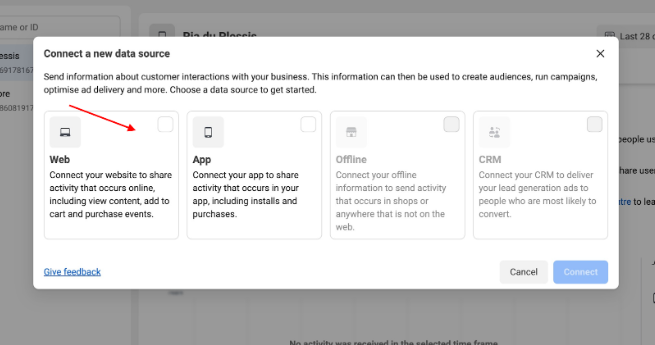
- Select Facebook Pixel, then click Connect.
- Name your pixel, enter your website URL (If you have not yet), and click Create pixel. When choosing the pixel’s name, keep in mind that with Events Manager, you only get one pixel for each ad account. The name should represent your business, rather than a specific campaign.
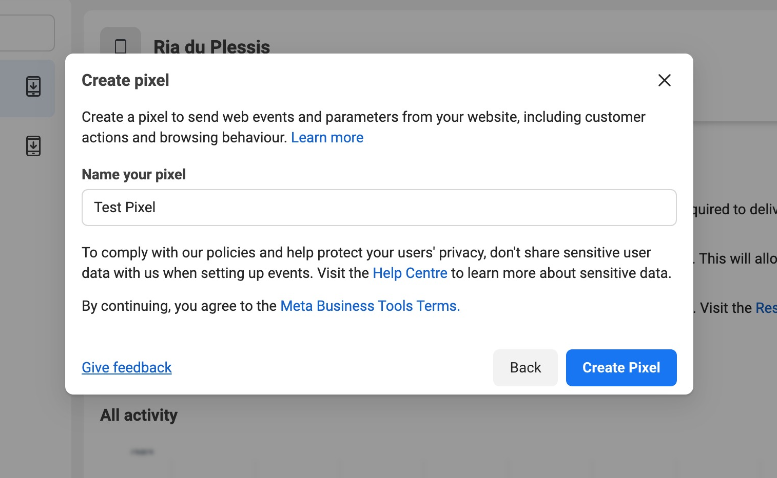
Step 2: Adding the Facebook pixel code to your website
To put the pixel to work gathering information on your website, you now need to install some Facebook pixel code on your web pages.
There are a few ways to do this depending on what website platform you use. For this example, we are choosing the WordPress installation option.
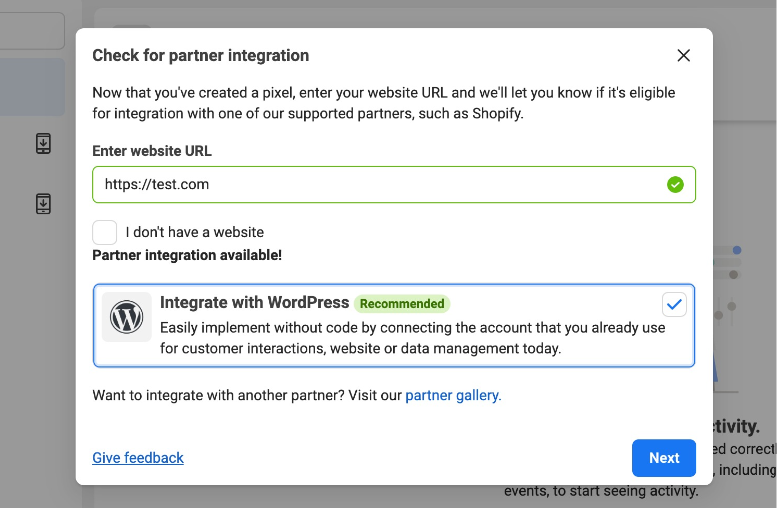
You will now be navigated to a screen that demonstrated how to upload the Meta Pixel (Facebook Pixel) plugin onto your WordPress website.
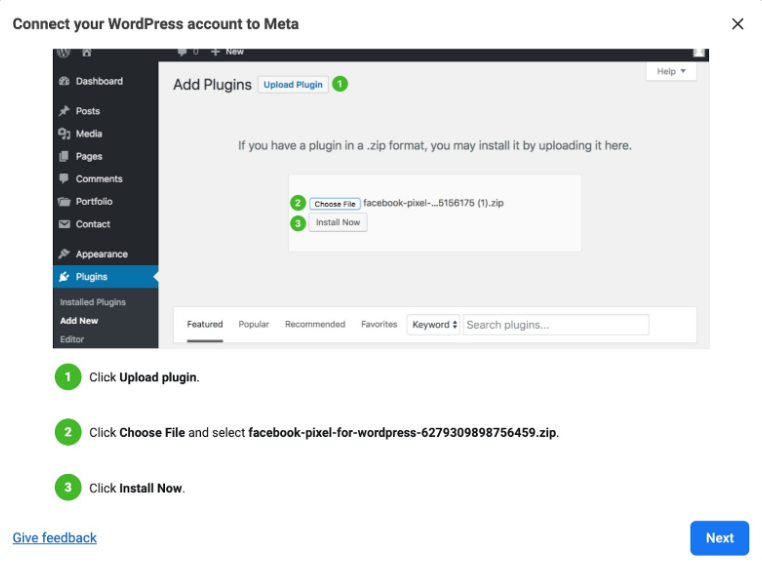
After you uploaded the plugin, installed it, and followed the instructions, you can send test traffic to Facebook to see if the pixel works.
Step 3: Set up Facebook pixel events
Your Meta Pixel is now set up, so now it is time to create your website events. This is the movement you want to track on your website. Let’s start.
Click the Open Event Setup Tool button and choose your Facebook pixel ID. Then click Settings and scroll down to Open Event Setup Tool.
You will then be prompted to enter your website URL. When you have done this, Facebook will provide a list of suggested events.
Click Review next to each event, then choose to Confirm or Dismiss. Click Finish Setup to continue.
If you followed my Facebook pixel setup steps, your Facebook pixel or Meta pixel should be working perfectly and track events that happen on your website.
Conclusion
The Facebook pixel is an indispensable tool for businesses looking to elevate their digital marketing strategy. By creating, installing, and utilizing the pixel, you can gain valuable insights into your audience’s behavior, optimize your ad campaigns, and boost your online presence. By mastering Facebook Pixels, you’ll be well on your way to achieving your marketing goals and driving success for your business.
Frequently Asked Questions
It is extremely easy to install a Facebook Pixel on your WordPress website. You can do this by installing a plugin and following the instructions given by Facebook Events Manager.
A Facebook Pixel will help improve conversion ratings on your paid ads. You will be able to target the right audience with the intent to convert when you know who to convert.


